
The first step to setting up your author website is choosing a domain name and hosting provider. These two foundational elements are important for different reasons and choosing carelessly can cause issues later on in the process. We’ll give you some advice on what to look for on both of these fronts.
Choosing a Domain Name
When choosing a domain name just keep some of these things in mind:
Make sure it represents your author brand well
- Try to keep it short but it’s not a huge deal if it isn’t
- Choose something that represents your author brand
- For the most part you shouldn’t be paying more than 7-12 dollars annually for a domain unless you need to buy it from someone else (more on that later)
- Example domains from self-published authors:
- Cristin Harber – http://cristinharber.com/4
- Joanna Penn – http://jfpenn.com/5
- Mark Dawson – http://markjdawson.com/6
- Stephanie Bond – http://stephaniebondauthor.com/7
- Stephen King – http://stephenking.com/8
Domain Name Registrars
A domain name is like real estate. You never really own it physically but you own the rights to using it. You purchase those rights through an authorized domain name registrar for a period of one year or more. Many domain name registrars are also hosting providers and vice versa. You do not have to purchase hosting through the same company that you register a domain name with (although that sometimes makes the whole process a lot easier).
There are dozens of places you could register a domain name with and (in our experience) here are some that are easy to work with:
- GoDaddy9
- Host Gator10
- Blue Host11
Buying Your Domain Name
This process is pretty simple. Go to the registrar of your choice and see if the domain name you want is available. Pretty much any well-known hosting or domain name registration company will have a search box on their front page or a menu item that says “domain” where you can search to see if a domain name is available.
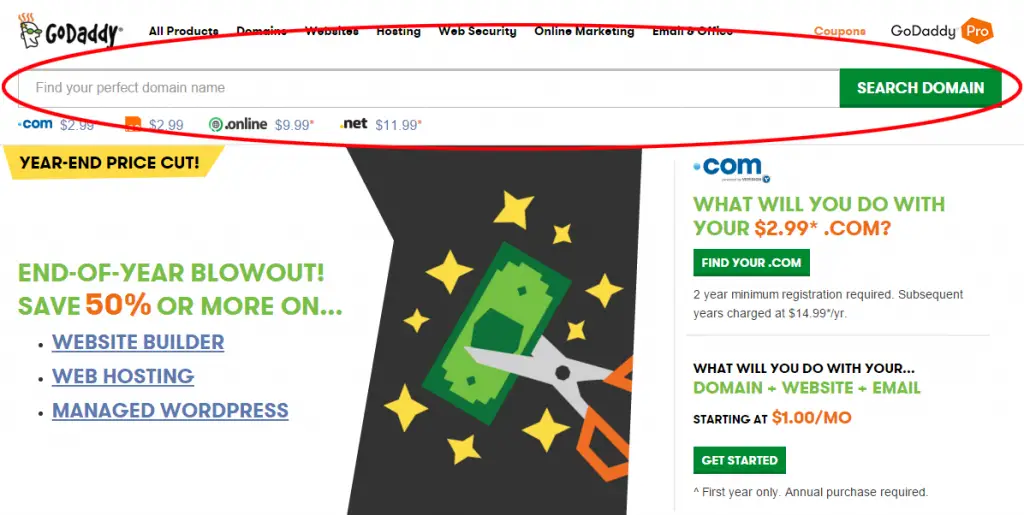
For example on GoDaddy.com you just plug in the domain name you’re looking for right on the home page.
Some of the hosts named above will require you to purchase hosting and the domain name registration process may not be as obvious (you may have to dig for it). Sometimes they will offer a free year of domain name registration for signing up with a hosting package.
Once you plug in a domain name and hit search or enter or whatever, you will get notification if the domain name is already registered and typically other variations of the same domain with different extensions (i.e. .nets, .orgs, .infos, etc).
Smart author tip: Pay careful attention to what a registrar is telling you when a domain is or is not available. For example GoDaddy is very good at painting a picture that a domain is obtainable when in fact you will have to go through a lengthy (and often much more expensive) process of buying a domain name from a private owner12.
 No matter which registrar you go with, just make sure you read the fine print. You also have to keep in mind all of the other products that a registrar may try to set up for you. Here are some of the things you may also be prompted to buy during the registration process (no matter who you go with):
- Hosting (which is fine if you want to buy hosting with your domain name registrar but if you don’t you can skip it)
- Additional domains (some hosts/registrars may even use language saying you need to protect your brand by purchasing a .net or .org version of your domain). If you are just starting out then it may not make sense for you to purchase these other domains, but once you start getting some traction and results, make sure you go back and pick these other domains up.
- Additional years of registration time (this one is more a matter of your business goals). If you plan on using your author website for a long time to come and you don’t want to worry about renewing, you can go for a 5 or even 10 year registration. If you don’t have the budget for that, setting things up for a year is fine.
Smart Author Tip: Domain & hosting providers regularly run monthly promotions to help get you started. Here is a coupon from Blue Host for [offer + aff] and GoDaddy for [offer+aff]*. These are affiliate links and when you order after clicking on them we may receive a commission, but it doesn’t affect your cost at all.
Other than those curve balls, the checkout process on many registration sites is pretty similar. You will need to change some settings on your domain but that won’t happen until you have your hosting set up which we’ll get into next.
Choosing a Web Host
This choice is slightly more important than your domain name registrar. While a lot of hosting services are the same, you want to make sure your host will provide you with all the functionality and support needed to do what you want with your author website.
 That being said, here are 5 areas you should look for in a hosting company:
A good customer service record: many authors building out their platform for the first time are going to need help eventually. It can be very frustrating dealing with a host that doesn’t have responsive, reliable and knowledgeable customer support. For example when you need someone at 11:47pm on a Wednesday night when you can’t figure out how to change some settings on your hosting account, it’s nice to have someone to call. Well-known hosting companies typically offer this level of service. No matter who you go with, look for features like 24 hour support.
The best way to know if a hosting company has reliable support is to read reviews on it. Search for reviews, ask people you know who have purchased hosting, and ask around on social media. As always, the best way to find out if a company is worth dealing with is to ask about the experiences of people who used the company before you.
Competitive pricing: Don’t get taken for a ride. Hosting is usually very cheap and most authors aren’t going to need a flashy advanced package. Compare rates with other providers and see if you are getting the best price. Make sure you are comparing apples to apples as well (meaning that you are comparing similar services from host to host). [offers+aff]
A good knowledge base: Sometimes you want to do the research yourself. It helps if your hosting company has a robust knowledge base of blog posts, help articles, and/or forums that can help you figure out problems or navigate the website setup process.
A diverse product offering: You may not need all the bells and whistles when you get your first hosting account but that doesn’t mean things couldn’t change. Look for a host that has other things to offer like email, SSL, and maybe even marketing services. In our experience, the companies that have these other services tend to be a little more serious than ones that don’t.
Signing Up For Hosting
We named some companies before that would be good as domain name registrars and many of those same companies also feature good hosting services. The following are some good companies to look at for your hosting needs.
- GoDaddy.com
- Hostgator.com
- Bluehost.com
Just like domain name registrars, there are dozens of different hosting companies out there. Just be careful that you don’t choose one that is inexperienced or not that well-known. Read reviews, ask friends and colleagues what has worked for them and in general do your homework.
Technical Choices
 When you sign up for hosting, you will be taken through an account setup process. You may be asked some of these common questions:
- How much space will you need?
- Will you need email accounts?
- What type of hosting environment do you need?
- Do you want shared hosting or a VPS (Virtual Private Server)?
- How much bandwidth do you need?
- Do you want sub-domains?
- Will you need SSL (Secure Socket Layer otherwise known as a security certificate)
- Do you need backup services?
Not all authors will require the exact same setup and it could be that you need something unique. For the most part though, if you are setting up a basic website with a handful of pages and content, here is what you will need:
Space: Many hosting services will provide you with at least 50 to 100GB of storage space which is infinitely more than you will ever need even if you had a 6 page website and added an additional 200 blog posts throughout the year. Here are the only reasons you would need more space than the most basic plans:
- You plan to upload video to your web host (note that this is not the same as embedding YouTube videos on your author website)
- You plan to host large files like audio or thousands of images or other file types that take up more space than text
- You plan to make lots and lots of different websites
Email: If you plan to use a branded email (i.e. [email protected]) then this might be a good thing to pick. Note that a lot of hosting accounts will come with at least one email account that you can make. Just remember that the email handle (everything after the @ symbol) will be the same as whatever your domain name is. So if your domain name is myawesomebook.com, any email is going to be [email protected].
Hosting environment: For the most part authors will encounter the question between Windows and Linux hosting. It won’t make much of a difference to you unless you need one or the other for a specific purpose. In our experience WordPress works much better in a Linux environment and much of the tutorials and support on the web revolve around that. Your hosting provider may not even ask you this question but in case it comes up, go with Linux. (Note: you will not need to know how to use Linux to have your website hosted on a Linux server.)
Shared hosting or something else: A lot of basic websites are set up on shared hosting accounts. This simply means that a website shares a server with other websites the host is servicing. There is nothing wrong with shared hosting, it does not impact SEO, and there are few reasons an author setting up a basic website would need something better.
During signup for hosting, you may also be asked if you would like a VPS or dedicated server. A VPS or virtual private server is essentially a website’s own server that it does not share with any other website. The same is true for a dedicated server. The only reason an author would need dedicated hosting or a VPS is if they had huge amounts of traffic coming to their site (for example more than 5K unique visitors per day).
Bandwidth: This is another term for data transfer rate or the amount of information that can be carried from one point to another in a given time period. Most hosts have either a set amount for economy hosting packages or unlimited bandwidth. Look for hosts that have an unlimited option because you don’t want your site to slow down or have users be denied access because you’ve reached your limit for the month.
Sub-domains: another matter of personal preference or business goals. A sub-domain is something like example.yourauthorwebsite.com. Sometimes they are included in hosting packages and sometimes they aren’t. If you don’t think you’ll need one, odds are you don’t.
SSL: SSL has gained popularity over the last year after Google’s announcement that it favors sites in search who have security applied. While that is true, it’s not as if having a security certificate is going to propel you past all other author websites in search. In other words it’s a small factor and there are bigger things to worry about first. If you don’t plan on passing sensitive information through your site on your own (as opposed to using a third party check out system like Paypal or Google), then you don’t need an SSL certificate right now. You can always add one later if need be.
Backup services: Many hosts feature this for free. It is always good to get a back-up of your site but we will also show you how to make one later on in this guide.
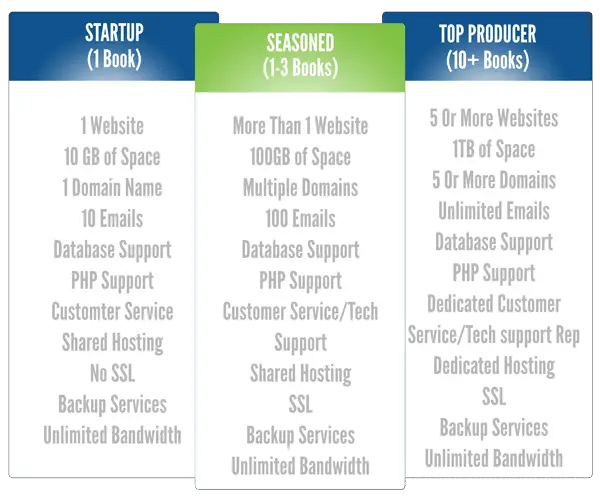
The above chart is a guide to what authors should be looking for based on their level of activity online. Not all hosts (or even the ones mentioned in this guide) have exactly the layout mentioned above but in general, those are the features authors should look for based on the level of expertise they possess.
Setting Up a Hosting Account
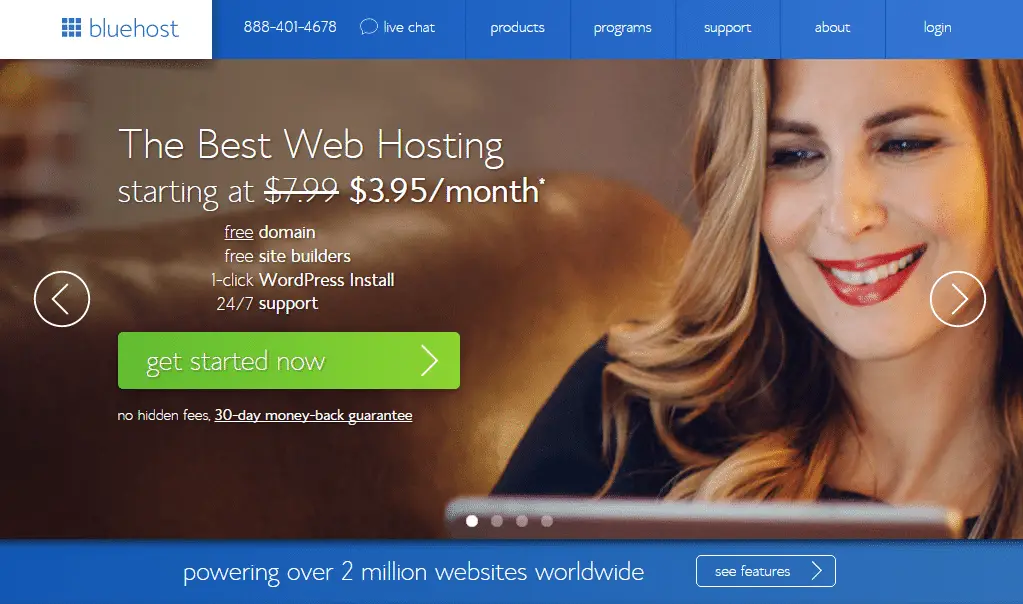
To set up a website, you will need hosting. A web host is simply a company13 that stores the files that make up your website. If you went with one of the companies named earlier in this post, the setup process should be relatively similar regardless of which one you go with. For the sake of having an example, we will use Blue Host interface to show you what you should be seeing during the process but try to make it general enough so you can use these instructions for other hosting platforms as well.
The Signup Process
Buying hosting starts pretty much the same way you would buy any other service. You go to the company’s website, find the area where they feature hosting and start their process. Here’s what it looks like on Blue Host.
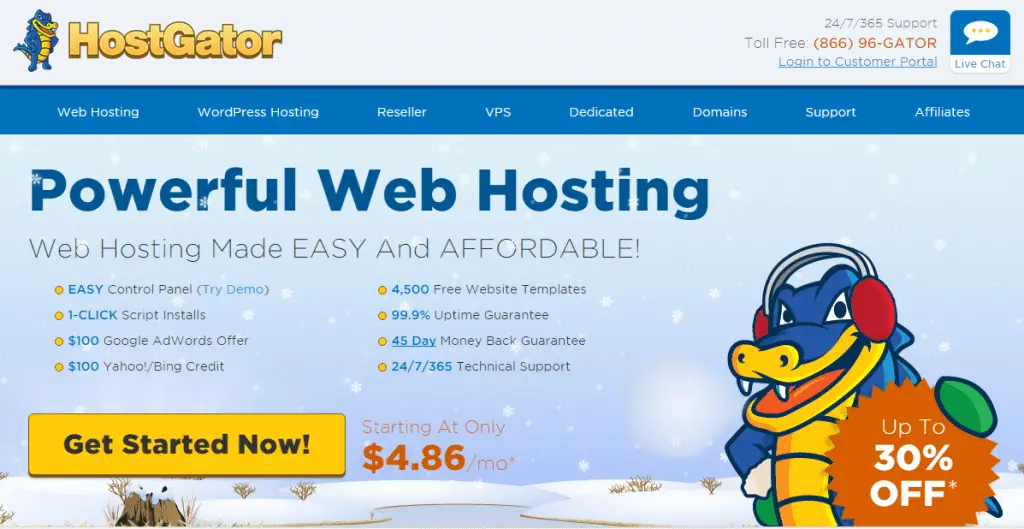
Here’s what Hostgator’s option looks like:
The basic idea is to follow the process through one of these hosts using the chart above as a guide. Refer to the chart whenever you are faced with a question about which option you should choose. Don’t get too worried either. Chances are you can change most anything you pic later on down the road.
WordPress-Specific Hosting Packages
Notice how some have generic web hosting while others have a specific WordPress hosting categories. These are good packages but you should note a couple of differences between specific WordPress hosting packages and regular web hosting.
- Hosting packages marketed as WordPress hosting packages may come with plugins that add functionality but at an increased monthly cost from the host
- They may come with additional support (which you may or may not need)
- Services like free migration (moving a site you may currently have), tutorials, an SSL certificate, or other security services (again which you may or may not need)
While WordPress-specific hosting packages can be convenient, you should carefully think about your needs as well as study this post. You may find that there are many things you do not need or that you can acquire in other places for free. For example there are tons of free tutorials on Youtube for learning about WordPress and there is even a walk-through in this guide. Additionally, WordPress-specific hosting packages can be a lot more expensive than regular hosting.
For most authors setting up a site with one to a dozen pages with just static content and a blog, a hosting package that costs more than 5-10 dollars per month is not necessary. In summation, WordPress hosting packages are more of a marketing ploy than anything you really need to run WordPress successfully for your author website. If you feel like the features in a package are worth it and would work well for your particular situation, then go for it. If you don’t want to spend the money, you don’t have to.
Regular Old Hosting
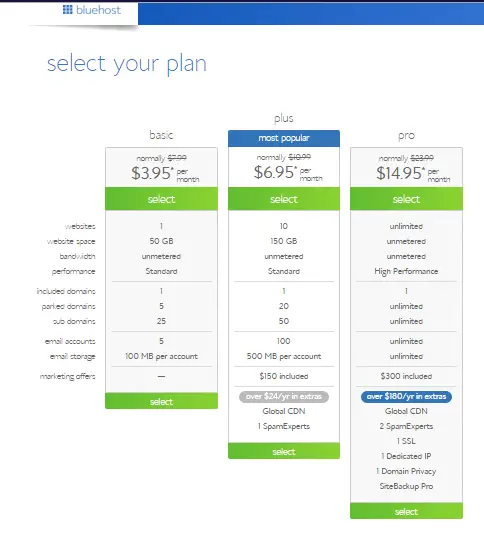
Most authors will be fine just getting regular hosting. Whichever company you go with, just look for services labeled ‘web hosting’ to start signup. Here’s a screen you would see on Blue Host when choosing among basic hosting packages.
Features
Some of the common features you will have to consider include bandwidth (the amount of traffic your site will receive), storage space (just like on your own computer), email accounts, software that the server might run and support for making databases.
Here is what you’ll need to run a WordPress installation:
- Host must be running a current version of PHP
- You need a database
- You need a cPanel account (this is where you would manage your hosting services. Try to go with a Linux hosting package with cPanel account)
Good hosting companies will have all of these features even in their most basic packages. Note that you do not have to run Linux with WordPress however there tends to be a lot of readily available information on Linux-based hosting and WordPress on the internet.
The Checkout Process
Hosting Time Period
Pick a package that works for you and start the process of buying it. The first question in many processes will be to choose how long you would like to sign up for. Most hosts require a minimum of 3 months but you can go for longer. Try to go with 12 months if you can however you can also do what suits your needs. Sometimes hosts will give you discounts the longer you sign up for.
Applying Your Domain Name
If you haven’t purchased a domain yet, many hosts will offer the option of registering one during the hosting signup process. This is a good way to go to get it done in one shot. If you already have a domain reserved on another registrar, not to worry, you can “point” it at your hosting account (we’ll show you how to do that later).
Checkout
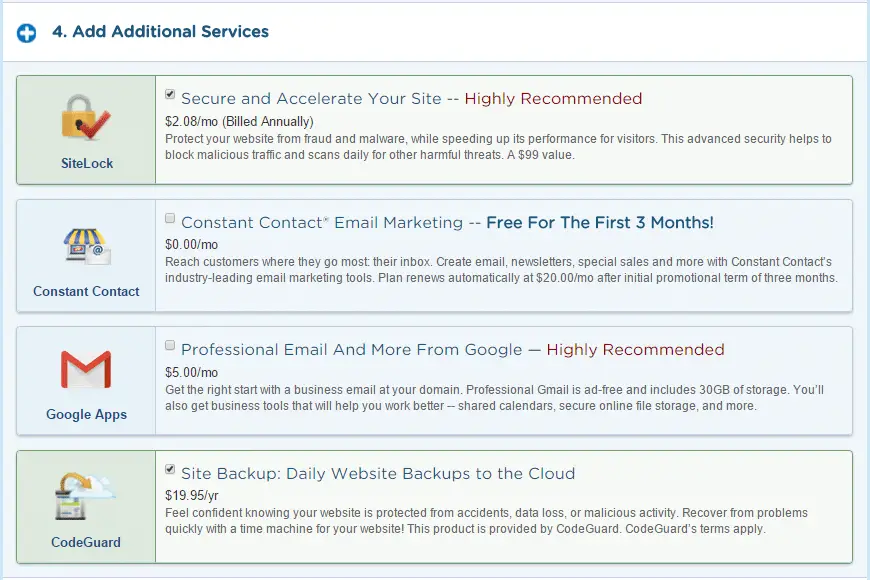
Below is a sample of Blue Host’s 4-step checkout process when selecting the economy hosting package (Linux with cPanel) for a 12 month period with no extras. That package comes with unlimited bandwidth, 100GB of storage (infinitely more than most authors will need), 100 email accounts and a free domain name.
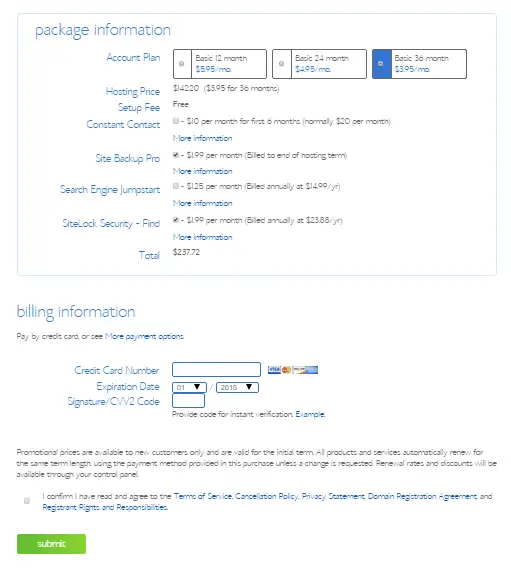
Obviously different hosts will have different checkout processes. The thing to keep in mind throughout these processes is to avoid getting things you don’t need. You can always add things in later (like marketing, SSL, additional domains, etc). For a basic hosting package that should be more than enough for an author website, you shouldn’t have to pay that much.
Host Gator Hosting
It helps to do a walk-through of different hosting providers so you can get a feel for the subtle differences. If you already signed up for hosting through Blue Host, you can skip forward to the next section on installing WordPress. To sign up for hosting with Host Gator go to www.hostgator.com.
For the most part many Host Gator plans are similar to Blue Hosts. If you’ve investigated other hosting providers you have probably noticed a trend. Many hosts are a commodity at this point. It’s sort of like milk in that no matter where you buy it from, it’s pretty much the same. That doesn’t mean you shouldn’t make sure a company is reputable but you don’t need to split hairs among leading providers.
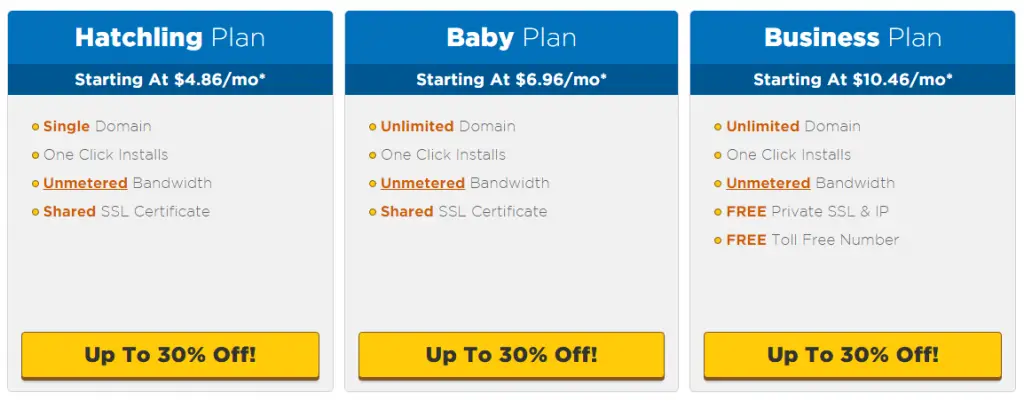
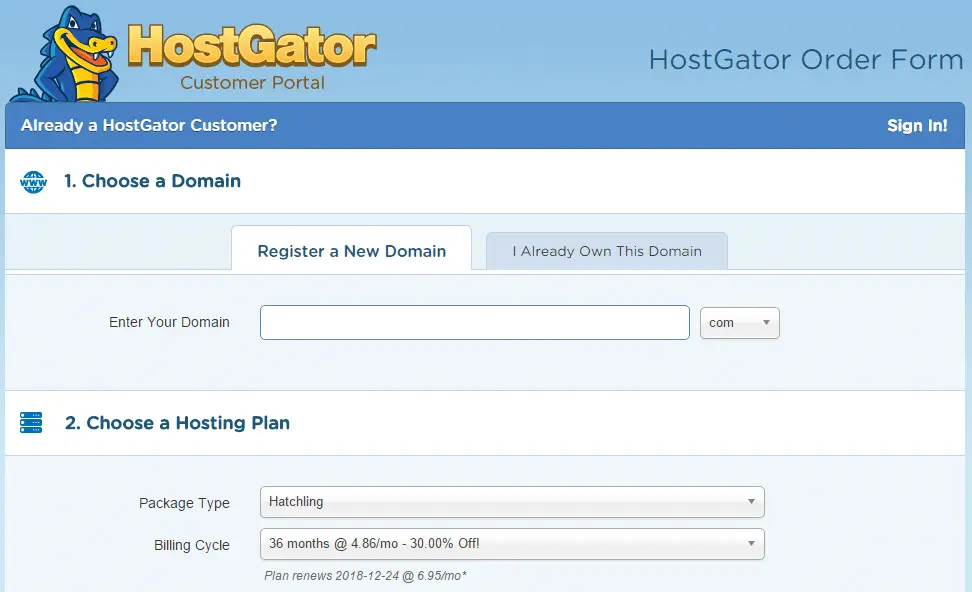
Once you pick a plan you will be taken through the process of setting things up. You can enter a domain name to register if you don’t have one already, verify the plan you chose and the duration you want to sign up for (minimum one month for Host Gator), and then you will enter your billing information.
In the final part of the initial signup you’ll be shown a list of “extras” that you can add to your hosting package. You don’t need to purchase any of these extra services if you feel they won’t add value for you. Odds are you already have a service that makes them redundant.
Two Ways to Install
We’ll go through two ways that you can install WordPress.
- Through your web host’s interface
- Via an FTP program (we’ll use Filezilla for this tutorial)
Installing WordPress With Your Host’s Interface
Many maintstream hosting providers offer a way that you can install WordPress right through your account. Even if you are technically savvy, we recommend installing WP this way because it is often much easier than doing it the traditional way.
Again for the purposes of our tutorial we’ll use Blue Host but many hosting platforms will have a similar process. Start by logging into your account
Once you’re logged in, you should see the services that you already signed up for earlier. One of them will be your hosting package. Click on “Web Hosting” then click the “Manage” button. Note that you can also just click the green manage button instead of expanding the menu item if you only manage one domain.
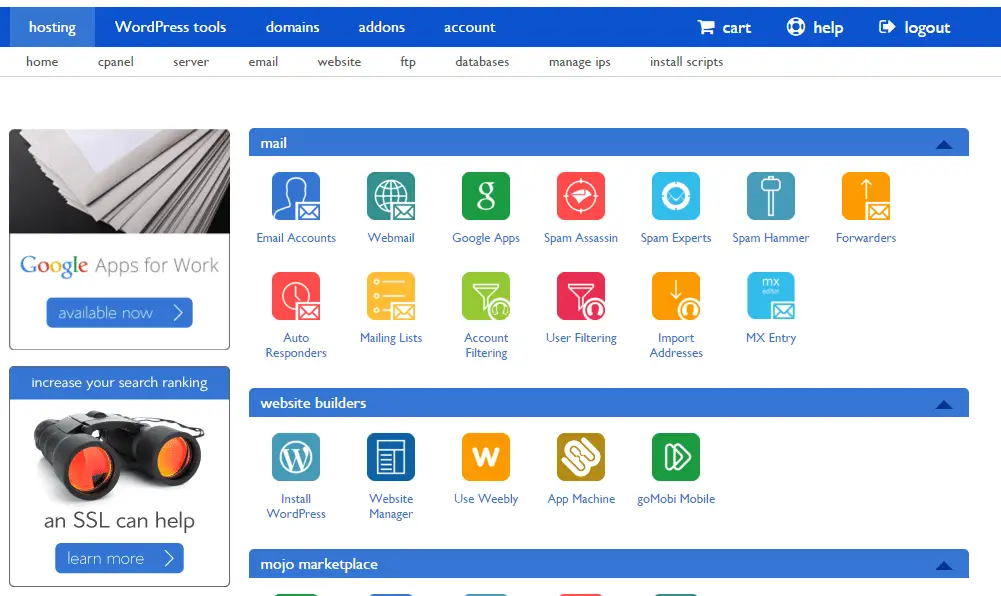
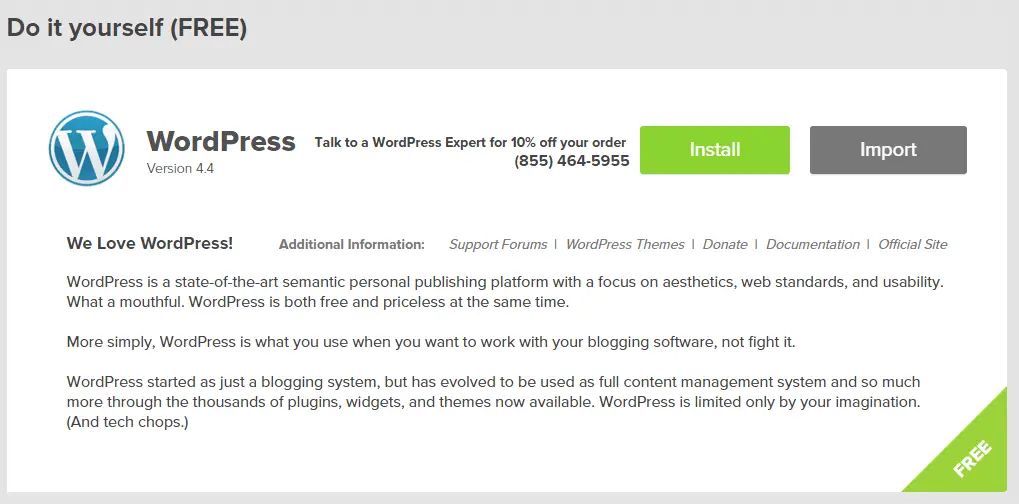
You should now be in the hosting details section of your account. This is where you’ll find all of the information related to your hosting service. Near the top of the screen you’ll see a section that says ‘Popular Apps’. Click on the WordPress icon.

You’ll be taken to a confirmation screen. Click the install button.
You have now officially begun the installation process for WP. On the first screen in the process, you’ll be asked to specify the following information:
- The domain (use the one you have purchased already)
- The directory where you would like to install WP (note you should leave this blank in most cases unless you are doing a second installation somewhere on your site)
- The Admin name (choose this carefully because you cannot change it later. Use your name or whatever name you want showing up when you’re posting blog posts)
- The password for your site
- The email you want to receive notifications or password resets at
- The title of your blog (you can change this later)
Once you click OK, the host will install WP onto your server. It may take a few minutes for the process to complete
Once the process is done, you’ll see a success message (alternatively if you don’t want to wait around, you’ll get an email at the address you entered during the setup process that your installation has finished).
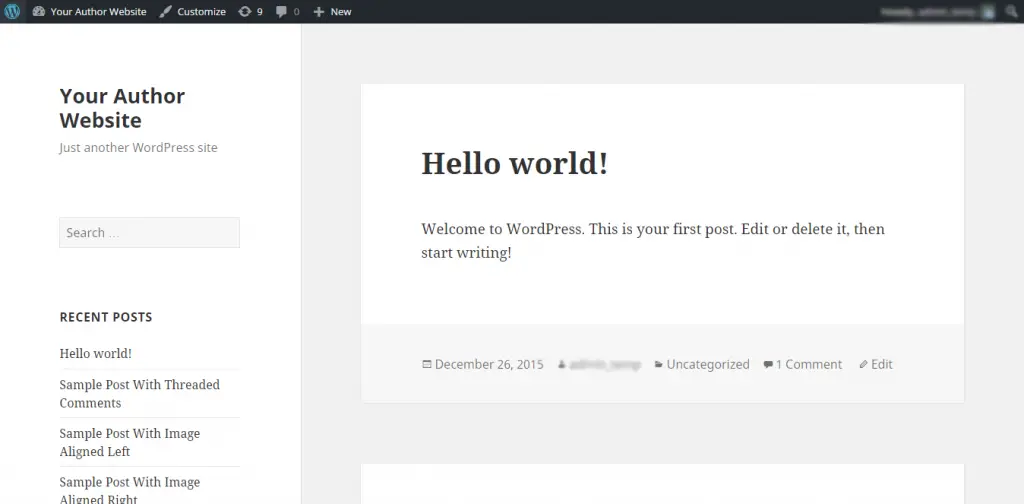
Once the installation is complete, visit the home page of your site and you should see something like this.
Installing WordPress Via FTP
If at all possible, you should use the process above as it is much easier to perform than installing WordPress manually. If you can’t, here’s how you do it manually.
Things you’ll need:
- Your hosting account
- An FTP program (we will use Filezilla14 but you can use what you want)
Downloading WordPress
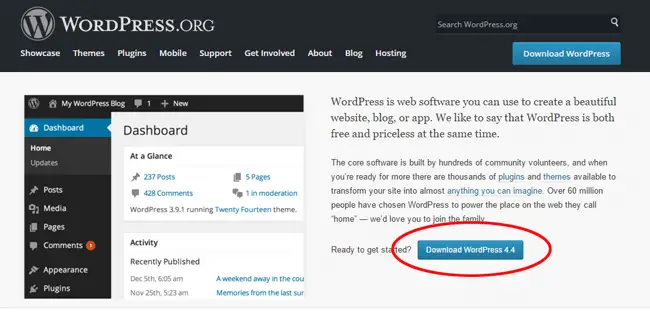
Visit wordpress.org15 (not wordpress.com) and download the latest version of WordPress.
WordPress is downloaded as a zip file so extract it and save it somewhere you’ll be able to find it later.
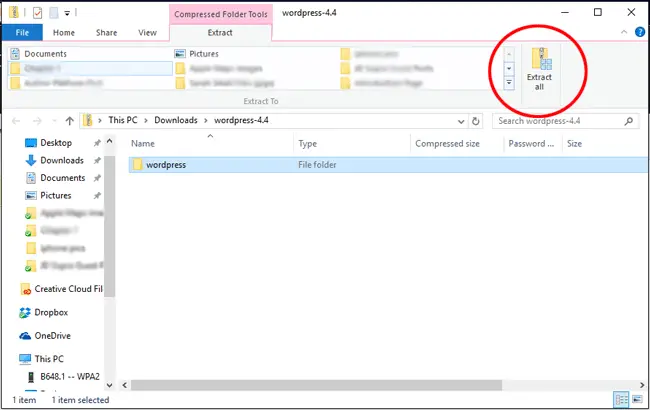
Note that depending on your operating system type and version, the window for extracting WordPress files may look different. Typically when you right click on the zip file, most operating systems will give you the option of extracting files. By default, many computers will just dump these files in the same directory where WordPress was downloaded (usually the downloads folder). You can choose to send the files somewhere else if you want.
Now that you have that out of the way, you’ll need to configure Filezilla to communicate with your host’s server. Download and install Filezilla if you haven’t already. It’s free.
Once you have that installed, log into your hosting account and look at your control panel. This is the same area where we installed WordPress before in Blue Host. You are looking for your FTP user name and password. This information can be found there. Once you have it, open Filezilla.
Once you have Filezilla open, click on File -> Site Manager. You will see the following window open.
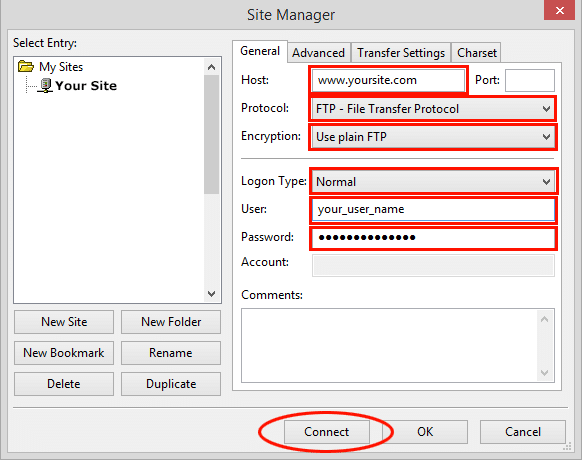
You’ll need to add your host or server name (typically this is your domain name), your user name and password information. For the protocol section you will most likely need to choose FTP – File Transfer Protocol. Set the login type as normal and enter your user name and password (these credentials are available from your host in the FTP section of your cPanel account.
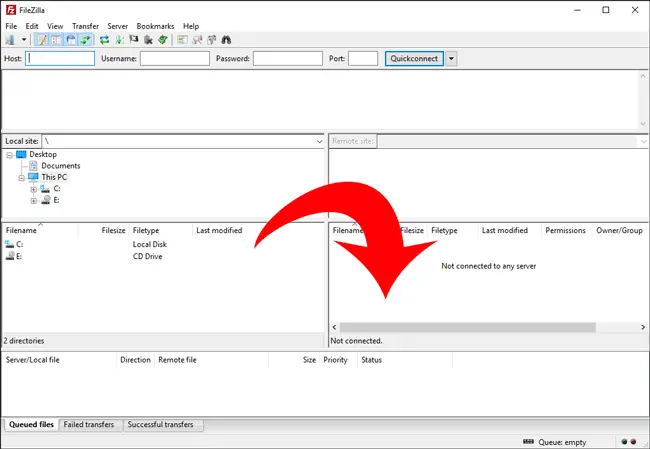
Once you have all your information entered, click connect and you should see some activity start to happen. The graphic below illustrates what all the panes mean.

In the left middle pane, you will see files that are on your personal computer. You will need to navigate to the area where you saved WordPress on your computer. Do so by double clicking the top menu item until you see the folder where you saved WordPress (hint: this is why it’s important to remember where you saved it.)
After you have found WP, in the right pane of Filezilla you will see your default hosting files. You will want to install WordPress in the root meaning the top level directory on your host. This is usually named something like www or hdocs or perhaps your domain name. Double click it to open it.
Once you have both areas ready, you can open up the WordPress folder on your personal computer side and drag all of the contents over to the server. There are thousands of files and depending on your internet connection speed, it could take a few minutes for everything to get transferred over.
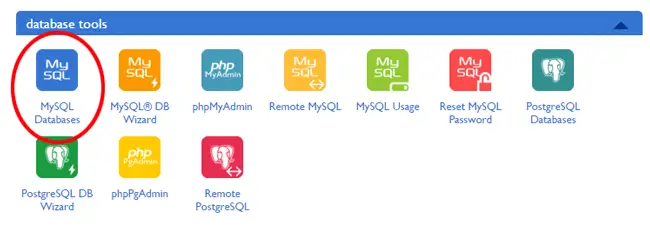
Setting up Your Database
During the easier process through your host above a database is automatically created. During this manual process, you will have to create one yourself. You can do this while files are uploaded to your host’s server. Note that you will not be able to access your WordPress site until you have set up a database for it. You will need the information generated during the database setup process to finish setting up your WordPress site.
Step 1: log back into your hosting account cPanel. In the example below we show logging into Blue Host.
Navigate to the section where you can create a new database.
Step 2: configuring your database. Make sure you write all of this information down because you’ll need it when you set up your WordPress site.
Different hosts will have varying interfaces but for the most part you will need to create a database, a database user, and a user name and password for that user. Write that information down and go back to your FTP file program.
Setting up WordPress
The WordPress files for your site should have finished transferring at this point. Go to the home page of your website and you should see a page like this which is the start of the setup process.
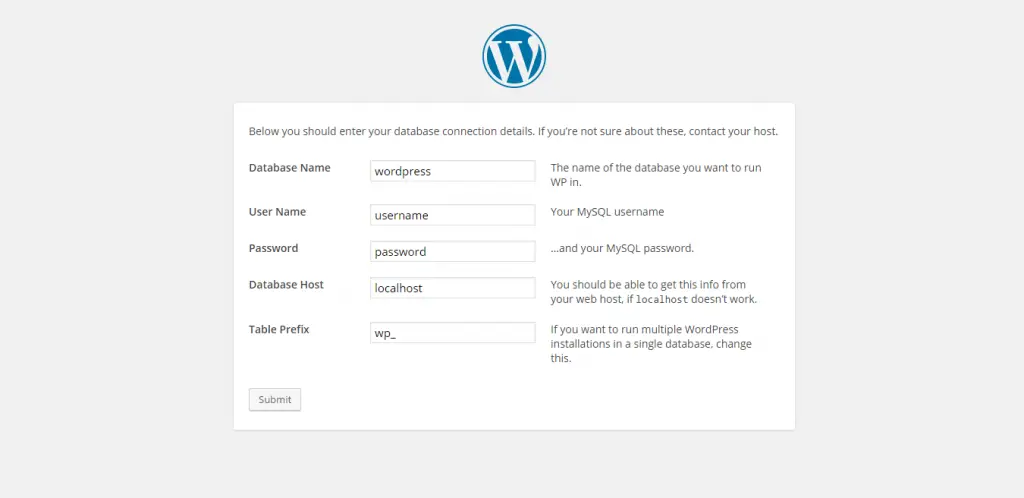
Follow the prompts to set up WordPress. You will need to have the database information you wrote down earlier for this. Once you complete the steps, you should see the default theme for WordPress as your home page.
References
http://cristinharber.com/4
http://jfpenn.com/5
http://markjdawson.com/6
http://stephaniebondauthor.com/7
http://stephenking.com/8
https://www.godaddy.com/9
http://www.hostgator.com/10
https://www.bluehost.com/11
https://blog.asmallorange.com/2013/07/how-to-buy-a-domain-name-thats-already-taken/12
https://en.wikipedia.org/wiki/Web_hosting_service13
https://filezilla-project.org/14
https://wordpress.org/15